
Have you ever wondered if Copic markers really are right for you?
It’s a valid question…
Most of the information you find on the internet about what makes Copic markers so great is written by people who are trying to sell them to you. They talk about Copics being the highest quality marker in the world, and tell you how versatile and easy they are to use. They make it sound like all you need to do to improve the quality of your artwork is buy yourself some Copics.
But how much of that is true, and how much of it is just marketing spin? Well, over the next few weeks we are going to try to answer those questions is an objective way.
Today’s article is the first in a series designed to help you navigate the world of Copic markers. Throughout this series we will take a look at the Copic color system, the differences between the types of markers Copic makes, and the best way to build a starter set if you decide Copics are right for you.
You can think of it as a Copic 101.
Now, if you’ve already invested in Copics and are building a collection of your own, I promise there will still be useful information in these articles for you too.
Today, we’re going to take a close look at the Copic numbering system. We will learn what all those letters and numbers mean, but more importantly, we will learn how understanding those letters and numbers will make your work as an artist easier.
Demystifying The Copic Cap
As you may know, each Copic marker has a series of letters and numbers stamped somewhere on it. For the Copic Original and Sketch markers, they are located on the cap. For the Ciao series of Copic markers, they are stamped on the body of the marker.
Now I know that many of you have questions about the different Copic marker types – Original, Sketch, and Ciao – and we will cover those in depth in an article very soon. But for now I want to focus on the numbering system common to every marker Copic makes.
Let’s look at an overview of the system in general, and then dive into specific examples.
Each Copic marker has an identifying combination of letters and numbers, as well as a specific color name. For our purposes, the color name itself is useless since it gives us no information about the color inside.
The letter on a Copic marker identifies the color family.
For example, a marker that has a capital “B” followed by a number is a member of the Blue color family. So B = Blue.
Currently there are 17 color families in the Copic lineup.
The Copic color families are:
E = Earth Colors
BG = Blue-Green
B = Blue
BV = Blue-Violet
V = Violet
RV = Red-Violet
R = Red
YR = Yellow-Red (Orange)
Y = Yellow
YG = Yellow-Green
G = Green
F = Florescent
W = Warm Gray
C = Cool Gray
N = Neutral Gray
T = Toner Gray
Most of the color families are pretty straight forward. When you grab a “B” marker, you’re gonna get a blue.
The gray family and the E family are the exceptions. As you can see above, you have a lot of different choices in the grays – from warm to cool, to toner and neutral. Warm grays are a bit greenish, while cool grays lean towards blue. Neutral grays are theoretically colorless, without leaning green or blue. And toner grays are formulated to closely match the grayscale value structure your printer uses. The E color family is a little more complicated. E stands for earth colors, and the colors that are available in this color family range widely.
For example…

E00 is a very light orange…

while E49 is a very dark orange (brown).

E87 is very green…

…while E04 is a dull red…

…and E81 is almost indistinguishable from a warm gray.
So as you can see, the E color family has a ton of variety in terms of hue.
The important thing to note here, when it comes to the letter in front of the numbers, is that more or less, the letter in the Copic numbering system lets you know at a glance what color (hue) you’re going to be getting.
Now let’s take a look at the numbers…
Ok, now I’ll admit that what I’m about to say will make me sound like a Copic nerd, but it really is a very important point. The numbers on a Copic cap are not a single number, and should be thought of and pronounced individually. What I mean is this… a marker designated E49 for example, is NOT “E forty-nine”. It is and should be pronounced as “E four-nine”.
Here’s why this is important – each number means something different and gives you different information about the color. The first number after the letter tells you the saturation, or color purity of the marker. The first numbers can range from 00 to 9, with 00 being a super clean color, and 9 being a dirty color containing more gray. Remember, this number only indicates color purity, and has nothing to do with how light or dark the color is.
Let’s look at an example using blue.
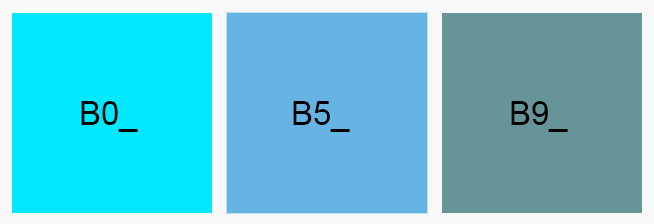
Remember, in this example we are only looking at the first number, therefore the swatches above are exactly the same value, or degree of light and dark. The only difference between them is the percentage of pure blue color each one contains. B0_ is 100% blue. B5_ is 50% gray, 50% blue. B9_ is 90% gray, 10% blue.
See how that works? As the number moves up the scale from 0 to 9, the color gets grayer but not darker. Now, I realize that the colors above may look darker to you as they move from 0 to 9, but I promise they aren’t. The combination of white background and level of desaturation may make them appear to be different values, but in reality they are the same.
Now let’s take a look at the second number…
The second number tells you how light or dark the color in the marker is. This number can range anywhere from 00 to 9. with 00 being very very light, just barely darker than the paper, and 9 being very dark, almost as dark as black.
Let’s look at our theoretical example again and then add the last number…
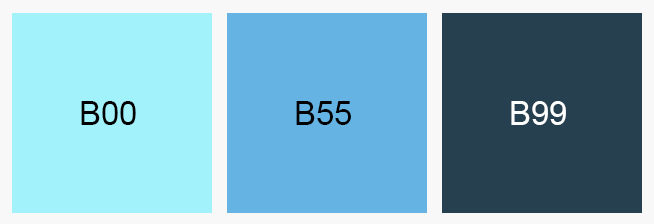
As you can see from the bottom eaxample, the color gets progressively darker as it moves from 0 to 9. It is important to realize that the color purity is the same in both sets of swatches. Only the value has changed.
Let’s recap!
- The Copic numbering system consists of a series of numbers and letters
- Each element should be pronounced separately (B99 is pronounced “B nine-nine”, not “B ninety-nine”)
- The letter indicates the color family (B = Blue)
- The first number indicates the color purity (B0_= pure blue, B9_ = dull blue)
- The second number indicates the color’s value (B_0 = light blue, B_9 equals dark blue)
Got it?
Good.
So how does this help you?
Well, understanding the Copic numbering system makes planning your color scheme and executing your final drawing much easier.
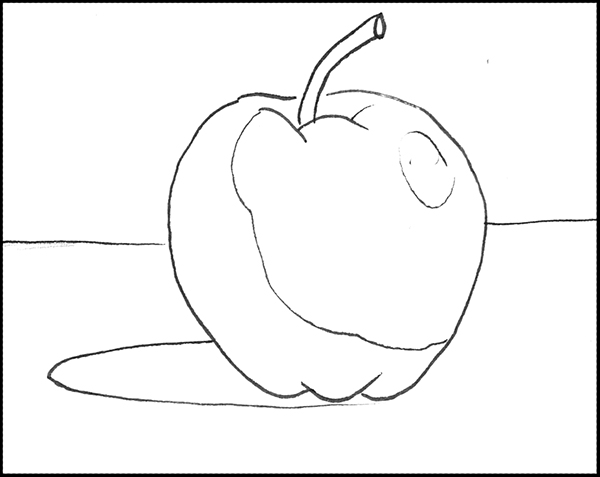
Here, let me show you… Let’s say I want to color an apple…
Now, without even having my markers nearby, I can use my understanding of the Copic numbering system to plan out my color scheme. I could do this anywhere, whether I have my markers with me or not. To accomplish this, I’ll start with the basics…
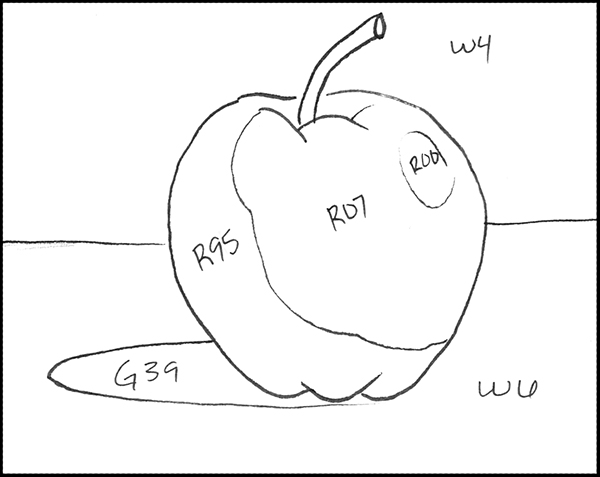
I know I want to color a red apple, so my primary color family is going to be “R”. Because I want my apple to look at least somewhat three-dimensional, I’m going to need a variety of purities and value in that R family group. I’ll probably need a very light, very pure color in the highlight areas, so I’ll need a R00. I’ll also need a nice pure red in my middle tones, but it needs to be darker than my highlights, so I’ll need an R07. For my shadow areas, I’ll want a very dark red, but since it’s in shadow, I’ll also want a dull, desaturated red, so I’ll choose an R95. Notice that my middle tone choice (R07) is actually darker than my shadow color, since 7 is bigger than 5. That’s ok, because duller colors LOOK darker than purer colors, and I’ll have a little reflected light in that shadow anyway. If push comes to shove, I can always lighten my R07 with my R00.
I still have my cast shadow, background, and tabletop to deal with. For the cast shadow, I’ll choose a nice pure, dark green. Maybe a G39. Honestly, I’m not sure if they make that color. But since I’m doing this as a thought exercise, it doesn’t really matter, and I’m sure they make something close. For the tabletop and background I’ll keep it simple and use a W6 and W4 respectively. Those color choices will give the drawing a nice red-green complementary color scheme, with my reds maintaining dominance.
So my theoretical drawing now looks like this:
Now all I have to do is take a look at which markers I actually have. Copic doesn’t make an R07 or a G39, so I used the closest colors I had on hand. It’s not important that I have exactly the same colors as I imagined, as long as I have colors that are close. Using the colors I’ve outlined above (with R08 and G29 in place of R07 and G39), the finished drawing will look like this:
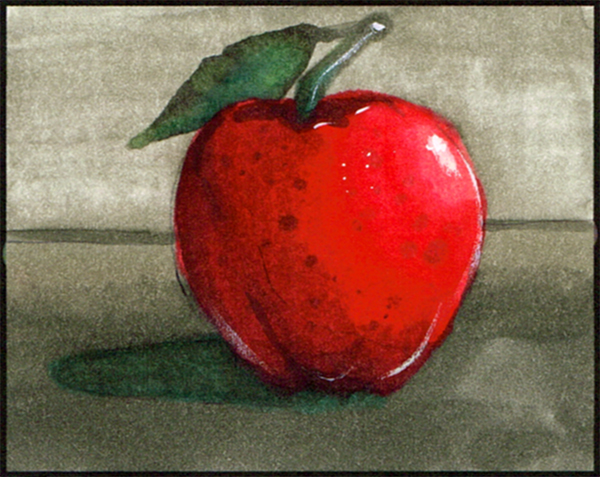
Colors used:
R00, R08, R95, G29, W4, W6
As you can see, understanding the Copic color system is actually very useful. When we understand the system, we can know what a color is going to look like before we use it. We can even pre-plan our drawing before we ever put marker to paper, and we can think of Copic colors in terms of actual color theory to help us make the best drawings we can make.
Honestly, The Copic color system is one of my favorite things about using Copic markers. The fact that I have so much information about any given color available to me before I ever pick up a marker makes my job as an artist so much easier.
So now you know! Let me know what you think in the comments below, and chime in with any other questions you might have about Copic markers 🙂
How helpful was this article?
1 Star: Oh man, that sucked… 5 Stars: Good God, it’s brilliant!
![]()
![]()
![]()
![]()
![]() (256 votes, average: 4.70 out of 5)
(256 votes, average: 4.70 out of 5)![]() Loading...
Loading...

thank you for this. I knew that the letter referred to the hue but I was doing the double digit thing ,. twenty two instead of two two . makes so much sense.
Hi Deb, glad you found this useful 🙂 and don’t feel bad – I’ve seen plenty of well known Copic artists who make the same mistake!
Interesting
Indeed 🙂
Thanks – I had figured out the letters but had no idea about the numbers – very helpful ?
Hi Karen, so happy you liked it 🙂
Definitely holding on to this in case I get a set. Thanjs
You’re very welcome, Connie 🙂
I’ve seen some other “explanations” of “understanding copic colors” but they always left me either just as confused as I was before viewing it, or at times even more confused…
This explanation makes sooooooo much sense. I’m a self taught artist with no study or real understanding of color theory. I knew the Letter on the copics was pretty much the color families but the double digit being purity and value I did not understand (also the importance of separating them as two-three rather than twenty three). I always picked colors by sight and 1st number thinking I was getting lighter and darker colors. Now I understand why those colors never turned out how I was hoping they would while I was coloring! I need to look at the second number for the darker values and the 1st number for the pure colors vs the more grey tones.
Thank you so much for the easy to understand explanation! I’m excited for the rest of Copic 101!
Hi Melissa, super happy you found this useful, and I’m glad to hear it was easy to understand 🙂 I tried very hard to create a different kind of article around this topic, since like you, I felt the other explanations out there didn’t do an adequate job of explaining it.
This was great! The most helpful thing was your explanation of the Copic letter and numbers, but my next favorite thing was the drawing of WHERE you put the colors on the apple. I’ve never had an art class so I need simplistic instructions on how to do shadows. Thank you!
I rieterate what Melissa(Aud 15th)expressed.I appreciate the time that you put into this article,thankyou,very helpful.
Thank you, Margaret 🙂
Thank you for the education. I find something new and useful in every one of classes. TFS
You’re very welcome 🙂 thanks for being here!
Five stars!
Interesting, well explained and easy to understand, can’t wait to find out more. Would love someone rich to buy me the complete set ??
Thank you, Sandy. If you find someone rich, send ’em my way after you’re done with them 😉
Absolutely ?
Such a knowledgeable individual and talented also, thanks heaps for this information
You’re very welcome, Lynda! Thank you for the kind words 🙂
Thanks, this was very useful . I have attended some Copic classes but it was a few years ago so I had forgotten how the system works. I am printing it out to keep handy with my collection. Looking forward to rest of the tutorials!
I give you 5 stars. ⭐️⭐️⭐️⭐️⭐️
Thank you, Anne-Marie! Very happy you liked it 🙂
Great post! Colour theory is not new to me but copics really are so learning the reasoning for the way the markers are labeled will definitely help me with choosing. So helpful and makes perfect sense! Thanks a bunch! 🙂
You’re very welcome, moongirl. Thank you for the kind comment!
Now that I understand I might just have to get my Copics back and start using them. I’d give you a 5.
Thank you, Suzy, and you should definitely break them out and start playing with them 🙂
As I am considering making some Copic investments, this article is a great tool with knowing how to select colors. Looking forward to the article on building a Copic starter set. Thanks.
Thank you, Gayle. The next article is coming soon 🙂
Thank you I really learned a lot.
You’re welcome, glad you liked it!
Thank you! Thank you! Thank you! I’ve also seen/read/watched other explanations of the numbering system, but nothing that took it to this depth and translated it into actually making use of it. Also printing this out to keep with my markers. I especially liked the concept of the 1st number representing the percentage of gray in the color. I knew it represented the level of gray, but thinking of it in terms of percentages is a game changer.
Thank you, Lee. I’m super glad you liked it! Thinking of them in percentages makes it super easy to actually put the knowledge into practical use 🙂
Thank you for this! It’s been my habit to color an object always using markers in the same color family and saturation groups, and I’m often unhappy with it. (i.e., R00 -R09) I hadn’t considered going more gray on the shadow areas- I really think this is going to help my work. Also, I’ve been frustrated by the overabundance of tutorials that focus on cute faces and anime (not there’s anything wrong with that) so I’m very happy to find your site 🙂
Hi Tyler, super happy this was helpful! I think once you start adding grays to your work, you’re going to be amazed at the difference. We’re very happy to have you here 🙂
excellent info…and so nicely written…which makes the info easily understood
Thank YOU!
Thank you very much, Michelle. I’m very happy you liked it! 🙂
I’m so glad I found your site! I learned so much just from this one post. Looking forward to learning much more!
Michelle from Australia
Hi Michelle! I’m so happy you found us too! 🙂
I am new to Copics and found this extremely helpful!! You made it simple and easy. TY!!
I am new to the whole copic coloring world. Haven’t even bought my first ones yet, but I will say from someone who knows nil about copics, this article was fantastic!!! Very informative. Thank you for this article. It really helped me a lot!!
Thank you, Kim. Glad you found it helpful! 🙂
Great tutorial. I wasn’t sure what the letters and numbers were for. I mean I kind of had an idea but not to this level of detail. Thanks!
Wow this was super helpful. I am just beginning to explore copic markers and the information in this article was very clarifying.
I agree with all the other comments – your explanation of Copic’s numbering system is fabulous! Thank you so much! Now that I know to separate the numbers (two-nine instead of twenty-nine), what about the 000 numbers? When planning colors for a drawing like you have in your tutorial, you determined the colors that met certain parameters and then chose the closest colors that Copic makes (thank you for giving us the assurance that it’s okay to be creative and flow like this). I guess I can just do the same and look at the lid and try it on paper, but because these are so light I can’t tell if I’m getting a 0-00 or a 00-0? Does it really matter? I’m sure I’m over-thinking this now, ha ha!
I’m amazed! Have always been so intimated by markers in general and especially Copic, but no one has ever explained how they work! Genius. Thank you.
New to copic markers- really appreciate the information- very helpful. Trying to understand the sets of 12,24, and 36 and what the letters A,B,C,D mean?
I just picked up my first set of Copic markers at a big local anime convention (at 40% off everything, hurray!), and this is the first article I’ve read as I prepare to start using them — WOW, so imformative! Thank you for the insights, this is going to make colour planning much easier once I get my head around the numbering system. (I colour comic books for a living, in Photoshop, so I’m very familiar with colour theory, but working analog with brushes and markers is a whole different ball game.)
Off to do more reading, a LOT more reading. I’ve clearly stumbled onto the border of a vast new land of artistic possibilities. 🙂
I’m a new Copic to be user. Had no idea they even existed. A great tutorial thank you
Marina
Australia
You make thing easier. I have a question one of the copic sketch markers that I’m considering on buying through Dick Blick art materials the marker is E95S- E 97S and E99S what does the S stands for? Thank you k
My email is [email protected]
I am 52 and just started drawing because I wrote a children’s book and need it illustrated but can afford an illustrator lol! Drawing is one of the hardest things I’ve ever done. Well that I’m trying to do. Anyway, thank you for this tutorial. It has beena huge help and I just can’t thank you enough! Take care,
Sincerely,
Todd Gardner
This article was VERY helpful to me. Understanding color saturation, value intensity, brightness, etc can drive a person mad! I’ve colored with markers for years – just not Copics. Copics are a whole new ball came and you (imo) really have to understand Color Theory to “get” it. It’s all very confusing and some articles I’ve read do not do half as good of a job of explaining the grayscale (purity) being the first number and value (light or dark) being the second number half as well as you did in the above article. So thank you for clearing up some of that confusion for me!
soooo, this might be a dumb question but when you get to the actual coloring do you color along the lines you imagined or do you color the entire apple R00, then 2/3 of it R08 then 1/3 of it R95? <meaning, does your R95 have both R00 and R08 underneath it? Or do you just blend the edges?
Awesome!
this was wonderfully easy to understand and your example looked like a painting!!! i never actually understood the graytones thing, i just said i did :3 thank you!
I have invested A lot of money in Copics and my head still spins about the number system! UNTIL NOW!!! You are so right IT ALL MAKES SENSE NOW…THANK YOU!!! The percentage explanation is a GAME CHANGER 😯 Still so much to learn but this is a HUGE help 😍
Hi Chris!
I might be restricted by locality in Australia but I can’t find a R95 on the Copic marker system?
It currently stops at R89?
Is there a similar tone that would work as a replacement?
Thanks in Advance
Adrian