In my opinion, inking is one of the most misunderstood processes used in the creation of a drawing. If you’ve ever seen the Kevin Smith movie, Chasing Amy, you understand that the argument for what inking actually is, is a much heated topic.
In the comic book industry, the task of inking a drawing is most often left to the professional inker, whose only job is to ink. Think about that for a moment. In that industry, inking a drawing is important enough that a whole group of artists have specialized to perform that one part of the process. Why would anyone specialize in inking? Isn’t it just tracing over the pencil lines so the drawing isn’t lost in the coloring process? Well… It can be that, but it should never be only that.
At its most basic, inking is the process of tracing black or (less often) colored lines over the pencil lines you used to create your drawing. You could just replicate the pencil lines and make them permanent, but you really shouldn’t. The fact of the matter is, your original pencil lines and your final inked lines serve completely different purposes.
A pencil is really adept at producing soft searching lines and indicating areas of value, and when you’re in the final stages of penciling a drawing, it is well suited to working towards the clarity of a clean final line. When using a pencil to create an outline, you try to make the lines as easy to read as possible. Clean pencil lines are great for showing you how accurate your drawing is and if your proportions are right or wrong, and for creating the outline of various elements of your drawing. At their best, pencil lines are easy to read and easy to correct, and let you know where to put your ink line. But more often than not, pencil lines don’t tell you how you should put those ink lines in.
Inked lines serve a different purpose than pencil lines. When inking is treated as a separate skill set, distinct in character and purpose, amazing things can happen. Ink lines are great for emphasizing various elements of a drawing. By manipulating the relative thicknesses of ink lines from one area to another, we can keep the viewer’s attention in the areas of a drawing we want them to look. We can also bring visual order to a complicated drawing by paying attention to our line work.
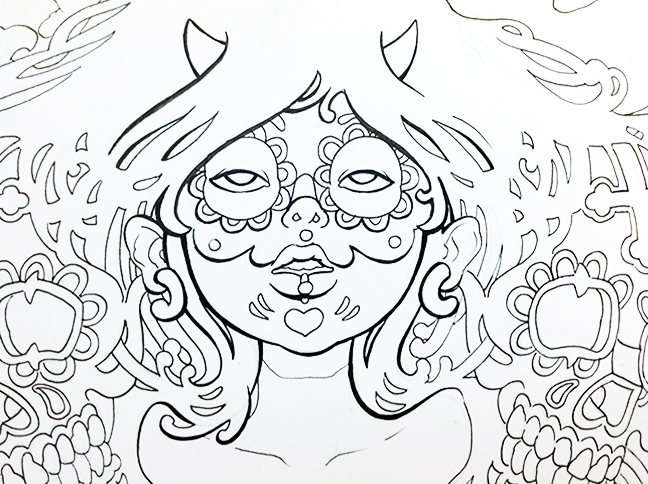
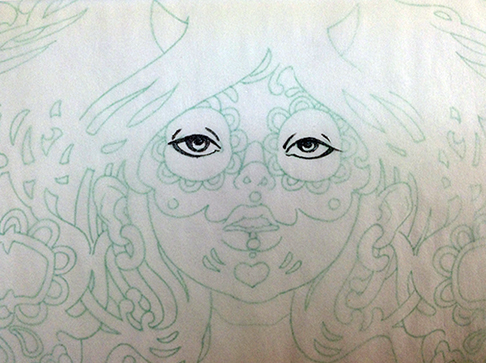
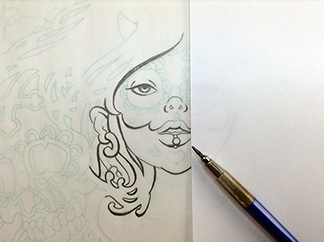
Take a look at the two examples below. In the first example, the drawing has been outlined with a dead-weight line. Because there is no variation in line weight, the drawing appears complicated and confusing. It’s difficult to tell where one form stops and another begins, and it’s so complicated you really have no idea where you are supposed to look first.
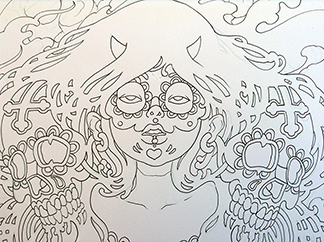
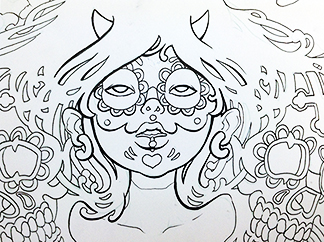
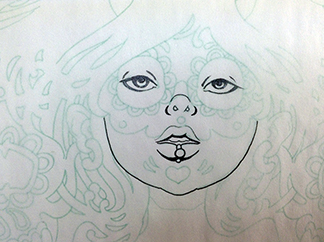
In the second example, these problems are beginning to be solved. The face has clearly become the focal point and appears to move forward into the viewer’s space. The line work moves from thin to thick and back again. The lines do more than just outline the forms. They support and suggest the physical characteristics of the parts of the body they outline, and when color is added, they will support and enhance that as well.
With so much variety possible when dealing with inked lines, how do we know which type of line will work best for any given area? The answer is we don’t, and that’s good because it means we get to play.
Developing an Inking Plan
If you want to see what your final inks will look like before you commit them permanently to paper, an inking plan is the way to go. With an inking plan, you can not only predetermine the best line weights to use in any given area, you can also test out several different line types in the same area to ensure you achieve the best possible result.
I mentioned above that a pencil line more often than not does not indicate how you should ink a line, but when it comes to developing an inking plan, the pencil is perfect for doing just that. Because the pencil is easy to erase, it’s perfect for building and trying out different line weights. So grab a pencil and let’s learn to ink!
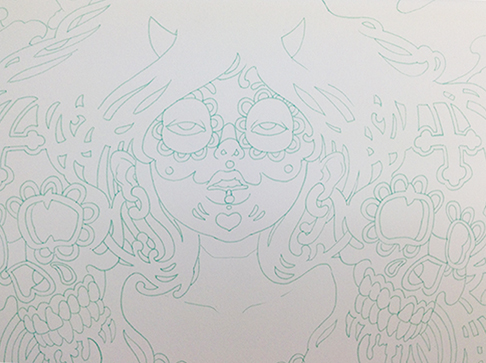
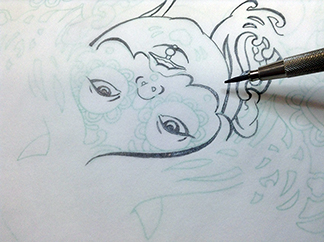
Step 1: Tape a piece of cheap tracing paper over your original line drawing.
Tracing paper is perfect for testing out different inking strategies. Not only can you see your original line drawing beneath, but you can build up separate layers of tracing paper for each individual area of the drawing. That way, if you’ve got the face and neck just right but then mess up on the hair, you just remove the layer of tracing paper that has the hair on it and try again. It’s a lot like using separate layers in Photoshop. Each important area gets its own layer of tracing paper. This allows you to experiment without ruining areas you already like, and to test out different inking strategies in the same areas to achieve the best possible effect.
Step 2: Begin to develop your line work.
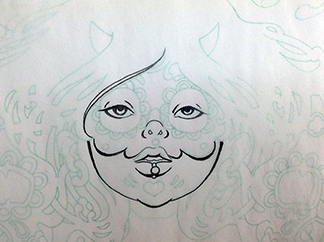
Start with the eyes, or in a non-figurative work, the most important element of your composition. Remember to use the biggest, boldest lines in the areas of your drawing where you want your viewer to look the longest. In a figurative work, the eyes are almost always the focal point and should be treated with a nice bold line. But don’t confuse bold for bland. Just because a line is thick at one location across its length, doesn’t mean it has to maintain the thickness as it moves left or right or up or down. The most beautiful lines vary dramatically along their length, moving from thick to thin and back again to best describe the underlying forms.
Continue to develop out the secondary and tertiary forms maintaining a hierarchy of line work. Concentrate your attention on the quality of each line, but remember, we’re not shading here. At this stage of the drawing process, we are trying to tell the whole story with line alone.
Step 3: Make yourself comfortable.
Feel free to rotate the paper so you’re not tracing in awkward positions. The simple task of rotating your paper so that you can reach an area most comfortably will have a tremendous impact on the quality of the lines you make. Don’t forget to use a piece of blank copy paper under your hand as a smear shield. While it’s not critically important to keep the layers of tracing paper clean and smudge free, the cleaner they are the easier they are to read.
Step 4: Draw first, judge later.
Continue to develop out the line work for the various areas of your drawing on separate sheets of tracing paper until you’ve added some level of line quality to each part. It is important to look at the drawing holistically before making any value judgments. Don’t stop to make corrections too early. It’s easy to get hung up on trying to make a specific area perfect, but it’s impossible to know if any given area is right or not when judged in isolation. So go through the whole drawing at least once before deciding how successful your effort in any given area is.
The process of pre-planning your inks may seem like an unnecessary task that adds time to the already lengthy process of completing a drawing. But think of it this way, would you perform the lead part in a play without first learning your lines, or take an important test without familiarizing yourself with the material first? Every drawing is a test. The more experience you have going into it, the better you will perform.
If you would like to receive personal feedback on any work you’ve created using the methods I’ve explained here, you can upload your image in the comment section below, or if you have any questions or comments, please feel free to leave a reply!
How helpful was this post?
1 Star: Oh man, that sucked… 5 Stars: Good God, it’s brilliant!
![]()
![]()
![]()
![]()
![]() (21 votes, average: 4.76 out of 5)
(21 votes, average: 4.76 out of 5)![]() Loading...
Loading...

Thanks for sharing this info!!!!
My pleasure, I’m happy it was useful for you!
Just a quick note – after reading this post, I went back and wathed ‘Chasing Amy’. The opening scene is priceless.
I am a firm believer that good inking skills are extremely beneficial, no matter what style, genre, or even media you work in.
Thanks Christopher, you made my day.
Couldn’t agree more, Mikey. And you’re right – that scene is absolutely spot on 🙂
This is really helpful. Everytime I try to ink my work it always turn out terrible plus it doesn’t help that my hands are unstable and shaky all the time. So this was a great piece of advice.
Wow! This is so helpful, love it.
Thank you 🙂
Wow, what a fantastic tutorial on improving inking skills! The step-by-step approach and clear instructions make it so much easier for beginners like me to understand and follow along. The tips provided are incredibly helpful, and I love how you emphasize the importance of practice and experimentation. The before-and-after examples truly showcase the transformation that can be achieved by implementing these techniques. Thank you so much for sharing your expertise and knowledge! Keep up the fantastic work. Martin Williamson.