While waiting at the counter for my morning coffee, the barista and I struck up a conversation. She mentioned that she wished she had artistic talent, but could barely draw a stick figure. I smiled and asked her, besides making coffee, what was it she was really good at, and how long did it take her to get good at it. She replied, “basketball, and a long time.” I followed up by asking if she worked on her game by only competing or if she practiced things like dribbling and shooting when she wasn’t actually playing. Her answer of course was she practiced the fundamentals every chance she got. No wonder she’s good at basketball and not art.
Practice vs Performance
The only way to get good at anything is to spend significant amounts of time practicing that thing. But notice I said practicing. I didn’t say doing. The barista didn’t get good by only working on her game during an actual game. She spent countless hours away from the game itself, practicing the different skills necessary to play. Monday and Wednesday – practice shooting. Tuesday and Thursday – ball movement. Friday – cardio conditioning. By working on the individual skill sets separately, she was able to pull them all together in a game and then analyze her performance after, and adjust her practice to account for the needed improvement. In short, she had a system.
Systematic Success
To perform any task at the highest level requires hours spent doing that task. All tasks are made of smaller tasks, or steps. When you get good enough doing the steps, the task itself becomes easy. Drawing is no different. To create a finished drawing requires multiple smaller steps. The steps are the process. Do you know what your process is? Do you even have one? Without a process, our drawings suffer. It’s impossible to become a successful paid artist without a process.
My Drawing Process
In my work I use the process listed below. It helps me to know how to begin, execute, and finish a drawing consistently every time. Depending on the drawing, I may rearrange the steps, but the process remains the same for every drawing I do.
Step 1. Idea generation
Step 2. Rough sketch
Step 3. Clean sketch
Step 4. Clean line drawing
Step 5. Inking plan
Step 6. Value plan
Step 7. Color plan
Step 8. Render the final work
I use this process for every drawing I make. I’ve learned the hard way that every time I finish a drawing in which I’ve omitted one of these steps, the drawing always suffers. It may seem like a lot of steps, or that using a similar process would add tons of time to finishing a drawing, but nothing could be further from the truth. Having a process in place reduces the time it takes to complete a drawing because most of the hard work is done before the drawing even begins.
Before I begin a drawing that I intend to show or sell, I already know how its going to look when it’s finished. I have an inking plan to guide me through the work, a value plan to tell me how light or dark any given area should be, and a color plan to let me know that the overall color scheme and color balance are correct. When it’s time to step up and actually make the drawing, all I have to worry about is the physical act of coloring, which is a task I’ve performed so often that I know I can do it well.
If you don’t have a process, you need one. It doesn’t need to be the process I’ve described, but there absolutely needs to be a process in place to execute your work at a professional level.
The simplest effective process I can imagine looks something like this:
1. Rough sketch
2. Finished line drawing
3. Color test
4. Finished work
In my opinion, this simple process does not answer all the questions finishing a drawing requires, but it is better than no process at all. If you’ve done even a little drawing, the rough sketch and finished line drawing steps should be pretty self explanatory, so I’ll only briefly describe the color test step.
Color Test
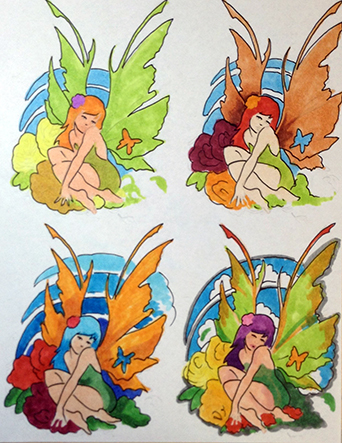
To make a color test, reduce and copy your finished line drawing. I like to reduce it small enough to fit four drawings on a single 8.5×11 piece of copy paper. Using the medium you are going to use to execute the finished drawing, color each of the four reduced line drawings. Don’t worry about staying in the lines or blending at this point. You just want to get an idea of which colors to use where and how the colors you’ve chosen look together. If after you’ve colored two of them, you find you like one part of the first one and a different part of the second, combine the elements you like from each to create the third. Continue coloring these reduced line drawing until you find one that works. If you need to, print more. The thing to remember is, if it doesn’t look good small, it’s gonna look worse big. So keep at it until you find one that works. It’s better to learn what you need to know on a small study that no one will ever see, than to try and figure it out in the real drawing.
Without a process we just stumble around in the dark. A process illuminates our path toward professional work, and opens up creative possibilities that are otherwise impossible to grasp.
If you would like to receive personal feedback on any work you’ve created using the methods I’ve explained here, you can upload your image in the comment section below, or if you have any questions or comments, please feel free to leave a reply!
How helpful was this post?
1 Star: Oh man, that sucked… 5 Stars: Good God, it’s brilliant!
![]()
![]()
![]()
![]()
![]() (17 votes, average: 4.65 out of 5)
(17 votes, average: 4.65 out of 5)![]() Loading...
Loading...

Hey Chris! So I received the email for this tutorial, and happened to notice that in the first stages of your process you were laying down Red Ink (?) and then lining over it with black ink. What were the materials you used for this portion? Thank you <3
In the beginning of my drawing process I often work with several different colored wax leads. Most often I’ll use a very light blue and a red both made by Prismacolor and both loaded into a lead holder (see photo.) I generally use the blue one first. It’s very light and I can basically scribble out the composition without any concern for detail or accuracy. Once I have something I like, I’ll go in and make some refinements with the red. Using the two different colors helps me differentiate between my lines. If I were just using a regular pencil I would have a much harder time picking out the good lines from the scribbles. Once I’ve refined my drawing with the red far enough that I think it’s worth moving forward, I’ll come in with a 2b lead to make further refinements and adjustments and to solidify the lines I want to keep. You can see all of these stages in the second photo. Once I have my drawing roughed and I’m certain the composition is working, I will scan the rough sketch with the blue and the red and print it out on another piece of paper, but at reduced opacity. I will then rework that printout until it’s just right. I never ink over the blue and red pencils or over regular pencil for that matter. I always do my final colors and inks on a printout of the line drawing that’s been converted to a very light blue and printed out on my favorite drawing paper. That way I don’t have to erase my pencil lines and I can do my inking at any stage of the coloring process since I’m not having to save my line drawing by inking over it first. I think this is an excellent question that deserves a thorough step-by-step explanation, so I’ll do a blog post on this topic in the next few weeks 🙂
I’m so glad you answered this question it was on my list of questions to ask you. Time yo order these pencils . Any suggestions where they are available ?
I get my wax leads at the local art supply. Most good art or drafting supply stores will have both the “leads” and holders 🙂 I’ll bet DickBlick has them as well.
Bravo on a excellent demonstration . I always remember to print up extra drawings for coloring with different colors but never made four smaller versions . Love all your hints. Your the best Ever!