
In this post, I’m going to show you how to apply a 200 year old classical oil painting technique to your Copic marker drawings. To the best of my knowledge, there are only a handful of marker artists who know how to use this technique, but none of them have simplified it in the way I’m going to show you today. So, if you want to take your Copic art to the next level and learn a secret technique that very few Copic artists know how to do, then this is the post for you.
But first, a little history..
The technique we will be learning today is called “grisaille”. It’s pronounced like this:
The word is French and comes from the root word gris, which means gray. The dictionary definition of grisaille is: a decoration in tones of a single color, especially gray, designed to produce a three dimensional effect.
The technique was brought to perfection by the French academic painter, Jean Auguste Dominique Ingres. Born in 1780, Ingres was one of the most sought after painters of his time, and with paintings like the one below, it’s not hard to imagine why.
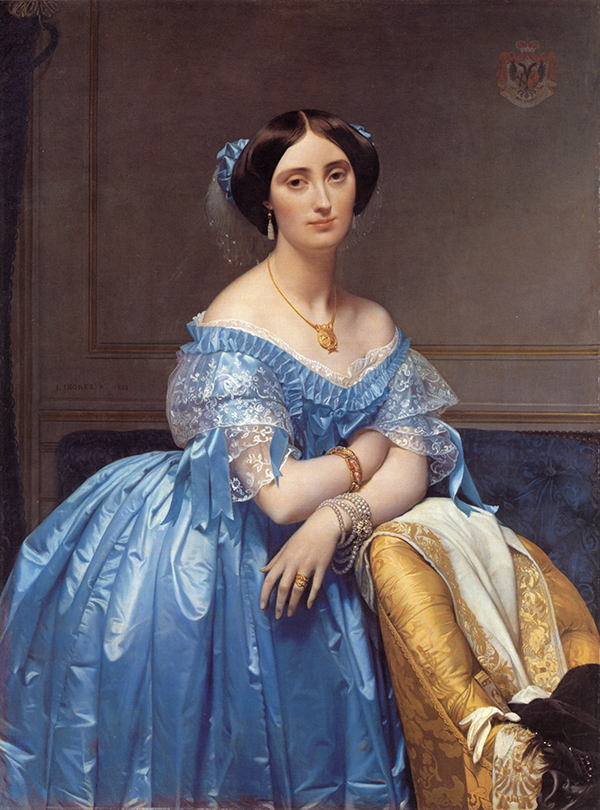
To execute the painting above, Ingres first completed an accurate line drawing from life. He then transferred the drawing to his canvas and rendered the work entirely in shades of gray. After the under painting was complete he glazed transparent oil colors over the top. He then finished the work with highlights and final details. We can see this technique broken down into its component parts in the two paintings below:
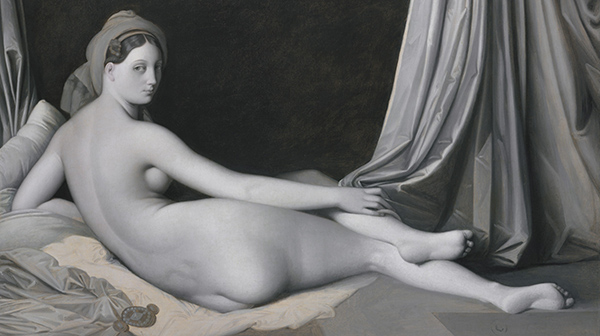
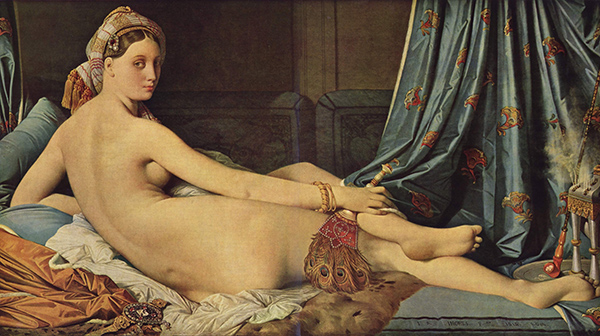
The black and white painting on the left was for some unknown reason abandoned by the artist before the color application phase. The one on the right is the redo the artist made using the same technique. We are very fortunate that the abandoned work and the final painting survived, as it gives us an amazing glimpse into this awesome technique.
How can this technique help you?
The reason this technique is so awesome is that it compartmentalizes the creation of a finished work into distinct steps, and makes each step easier to do.
The benefits of the grisaille method are:
- Coloring with only grey simplifies the coloring process by allowing the artist to focus on light and shade without having to worry about color.
- Fewer markers are needed to complete the final drawing because the value structure is established separately.
- Less time is needed to complete the drawing from start to finish because the compartmentalization of line, value and color are broken into separate steps.
- Unique color effects are achieved that can’t be accomplished with any other coloring method because the gray under-color shows through and modifies the transparent over-colors.
- Creating the illusion of form is much easier when using only shades of gray, since most of us have plenty of practice doing it with pencil shading.
- It’s easy to add transparent color over the top once we have the form established and the values finalized all with grays. Since the over-color is transparent, the values below show through, making it look like a perfect color gradation from dark to light.
Pretty cool, huh? Let me show you how to do it.
Step 1: Rough Sketch
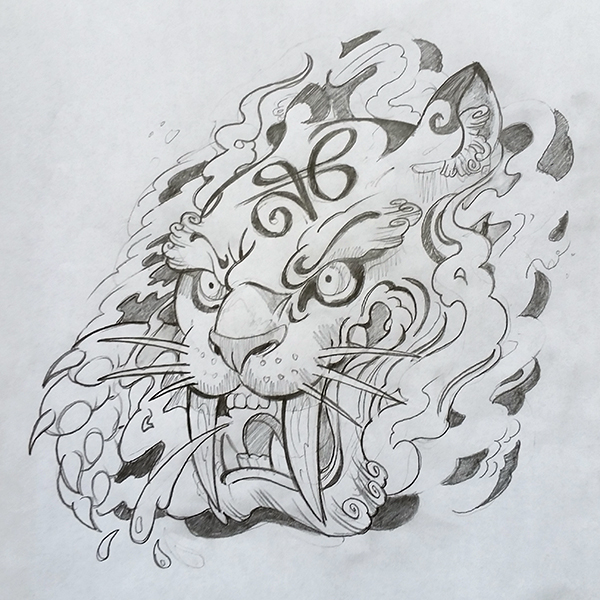
When I started this sketch, I had no other plans for it. Basically I was just playing around and drawing for the fun of it. I seldom shade my sketches like this, but this drawing kind of took on a life of its own. By the time I was done, I had what amounts to a fully rendered idea, so I decided to move forward with it.
Step 2: Blue Line

In this step, I scanned the original sketch into Photoshop and converted it to blue line. I do this step for every drawing I do. Converting my line work to blue line allows me to print it out on the final drawing paper so my coloring process never takes place on my original drawing. The benefits of this process are many, including always having the ability to reprint the line work if I make a coloring mistake. It also allows me to keep the original sketch, which is good because often I’ll sell it along with the final color original.
Exclusive Bonus: Learn exactly how I convert my drawings to blue line in this FREE 7 minute tutorial video. Click here to watch.
Step 3: Grisaille
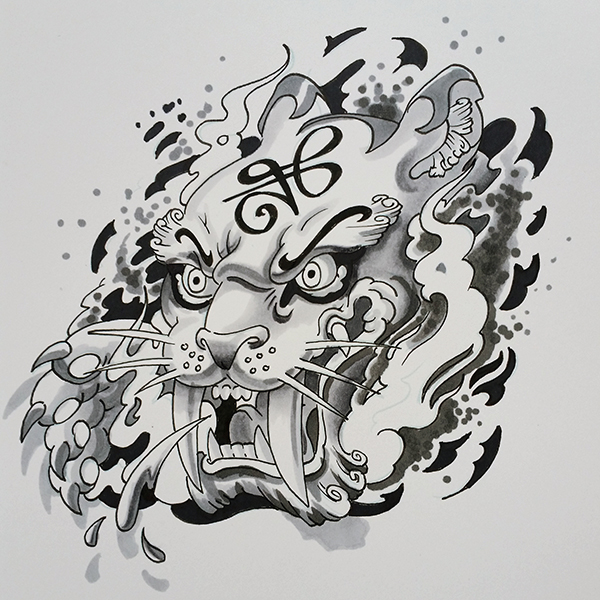
In this step I work to develop out the form and values. Coloring with grays is quick and easy and lets me know if the final drawing is going to work. When coloring with grays, all you really need to think about is the direction of light and whether or not the finished grisaille looks three dimensional.
After I’ve completed the grisaille to my satisfaction, I’ll scan it back into Photoshop and print it out on my preferred coloring paper. Once again, this step acts as a back up. If I screw up while coloring, I can always print out another grisaille.
Printing it out like this also has another benefit – Inkjet ink is impervious to Copic ink, which means I can lay as much Copic color over the top of my grisaille without lifting, lightening, or otherwise disturbing the gray under-color.
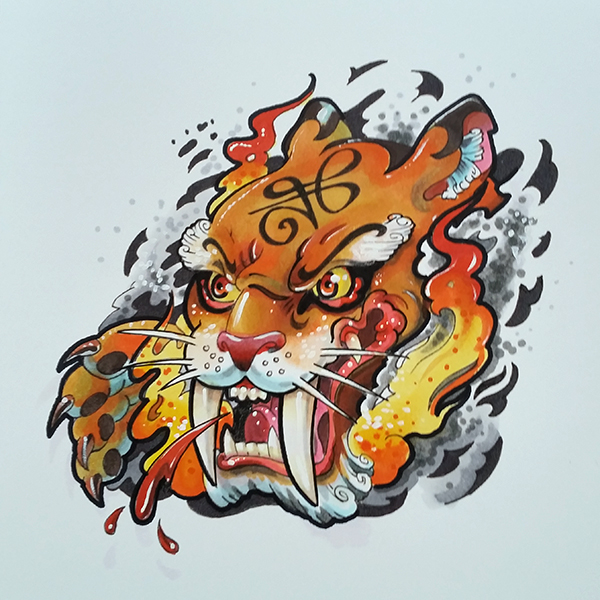
Step 4: Final Color
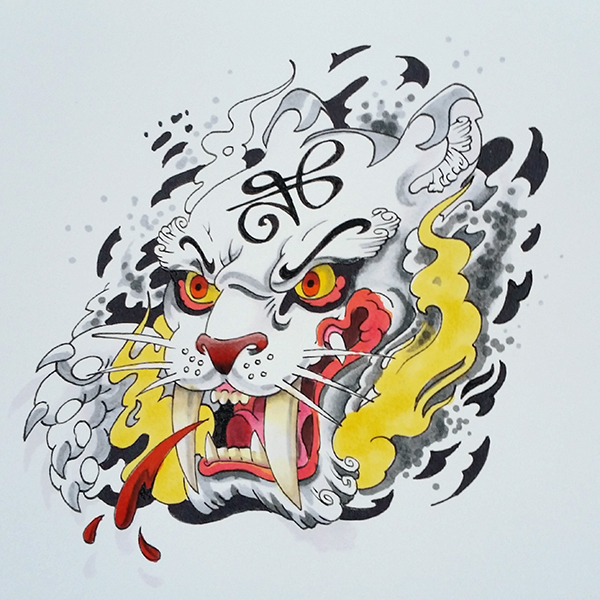
This step is really pretty self explanatory. I color the damn thing until it looks good. With the grisaille technique, the coloring process is really pretty simple. Since Copic ink is intrinsically transparent, the gray drawing underneath shows through every color I lay down.
For example, the greenish shading in the eyes is the gray showing through underneath the yellow. Since the gray I used leans a bit towards the blue, the combination of the transparent yellow on top and the blue gray underneath creates the color green.
 Grisaille further simplifies coloring since all the values are already established. What this means for you is that because the value structure is already established, you don’t need to use Copic colors from light to dark. Normally, to color the orange color of the tiger I would use YR16, YR18, E97, E27, and Y32. For this drawing, because the patterns of light and dark were already established in the grisaille, I only need Y32 and YR16.
The final drawing from start to finish, including scanning and coloring the grisaille in grays and then laying in the final colors, took less than three hours. To execute the same drawing using a more traditional coloring method would normally take me six hours or more.
The colors used in this drawing were:
T1
T2
T3
T4
T5
110 Special Black
Y15
R29
YR68
RV13
B00
E43
YR23
0 Colorless Blender
Oh and one more thing…
The basic principals of this technique are applicable to almost every type of transparent media and to nearly every style of drawing. It also works for tattoo. So regardless of your genre or media of choice, you really should give the grisaille method a try, and if you do, be sure to post your drawing in the comments below. Go ahead and give it try, you’ll be surprised by how much easier it is to get the professional results you’ve been looking for.
How helpful was this post?
1 Star: Oh man, that sucked… 5 Stars: Good God, it’s brilliant!
![]()
![]()
![]()
![]()
![]() (69 votes, average: 4.74 out of 5)
(69 votes, average: 4.74 out of 5)![]() Loading...
Loading...

This is great! I will definitely try this method sometime. I didn’t expect this was your process when I saw the final product on IG. A very interesting surprise~
Thanks Ryuu! I don’t always use this technique but any time I need to do a drawing fast this is my go to process! Can’t wait to see what you do with it!
Sweet!!! I just switched to oil instead of my preferred acrylics…will definetly give this technique a try!!!
OH! You’re gonna love this technique with oils! Be sure to let the grissaile dry really well before you glaze over it, and use a glazing medium to thin your oils!
May, I don’t know if you are aware that I am also a classically trained oil painter 🙂 I’m happy to help with any questions that may arise for you
This is the method taught for egg tempera painting as well. All the egg tempera manuals teach to work out the drawing in grisaille using ink watered down to make grays, using the egg tempera to add the color to the finished grayscale drawing. Some icon painters work this way as well using gray (for cool colors) or umber (for skin and warm colors) first and then layering thin washes on top, e.g. Archimandrite Zenon and Aidan Hart.
Thank you for sharing, Yvonne 🙂 I wasn’t aware this technique was used in icon painting! Kinda makes sense though considering egg tempera is inherently transparent!
This technique is definitely used in “regular” paintings in egg tempera. Most icon painters start with a dark basecoat and build layers of lighter colors on top, but a few do it this way. Notably Zenon went further and further back in time researching, traveled to Italy, etc…and found that this was the more ancient practice. I have tried it once — faces turn out *very* caucasian that way, LOL, b/c the white of the gesso shines through. Lately I do a hybrid: I shade in pencil, then layer the dark basecoat, and I don’t need as many layers, and same with the light colors: fewer layers needed because underneath its transparent. Faster and also better practice, b/c no “bas relief” effect, which is bad for egg tempera.
Funny how similar the processes are! You can apply the hybrid technique that you use to Copics so long as you scan and print the pencil drawing first! Again, thank you for sharing, I love learning about new techniques 🙂
Awesome post 🙂 I use colored pencils and am pretty good with them but I sometimes think they make things take longer than markers.. would love to get better with Copics.. I just have a hard time with them since they’re not what I’m used to. I bet I could apply this technique to the work I do by doing the grisaille with the colored pencils since they are easier for me to blend with, and then use Copics on top of the printed copy of that and really cut my time down!
That sounds like an amazing use of this technique! Once you’ve printed out your grisaille you should have no problem using Copics to add rich color passages, you’ll also be able to work over the Copic colors with colored pencils to finish it off!
Something new to add to the list of techniques I have learned form you. Thank you as always!!
You’re very welcome Tabatha! 🙂
Thanks heaps for this idea, I will definitely be trying some of this out and thanks for the education on how to say the word, most of us are embarrassed to try out something we can not pronounce.
Hi Lynda, that actually made me laugh! I’m super glad you liked the tutorial, and I know you’re gonna love the technique. Feel free to post the drawing here when you’re done. Can’t wait to see it 🙂
This is amazing. I’m giving it a go over a little drawing that I photographed and turned into grayscale. Who knows if it will turn out or bomb out but I can always reprint and start again if it doesn’t work. Thanks very much.
You’re welcome, Cindy! Would love to see the drawing you’re working on when it’s done!
Hey Chris when doing this technique and your grays are completely rendered. Can you still apply Color to the drawing if the grays were done with copies and get the same effect or Do you have to scab it in still ?
Hi Mike, great question. You can do either. If you want to keep your grays from mixing with the colors that you lay over, then scan your grays, print it out, and color over that. However, if you don’t mind a little inter-mixture between the two, you can color right over the Copic grays. For this post I printed out my grays, but in the Traditional Tattoo post I colored straight over the top of the original colors.
What paper do you use?
Hi Essie, my favorite paper is Strathmore 100lb. bristol, however any heavy cardstock will do just as well 🙂
Hey Chris, I haven’t gotten the means yet to get my hands on a cool set of Copic markers. I was wondering if one can do grisaille with coloring pencils or ordinary markers.
Hi Gen, awesome question! Grisaille is an awesome technique that goes back hundreds of years and can be done with nearly any media. When I created this tutorial, I actually played around with Prismacolor colored pencils as well, and I learned that you can follow this advice step by step with your colored pencils and get a nearly identical result. The same holds true of all of the coloring tutorials we have here. If you try this, I’d love to see 🙂
Grisaille is indeed a critical skill for any painter, and one I am just now learning. Yet once again Christopher you have explained it in one of the more accessible ways I have ever been exposed to. Again I am such a huge fan of your ability to teach, esp online, where it is often impossible to find someone who can be really clear through all the steps. I always feel like you are my secret weapon in all that I am learning. So glad to have found you some time ago. Wonderful!
Another great tutorial. I don’t use Copics as much as I would like, I have been working mainly on improving my digital work. This process is great with digital as well since one can use different layers and change the opacity and blending modes for the hues while maintaining the values of the underpainting. I tend to do more along caricature work and Jason Seiler has some great digital painting classes on Schoolism where he explains using this technique as well. At some point I need to turn off my Wacom and get back to traditional mediums. Once again, great tutorial. Thanks
I’ll totally do this with my next piece! One question: what did you use for the white highlights? EX: eye gleam.
This technique is great, and your process is really interesting! My only major question tho, is regarding your paper.
I use Bristol for my comic work, and it’s default size does not play well with printers. What brand and size paper do you wind up using?
This was extremely informative!
Great post, Christopher! Grisaille is an awesome, time-honored technique.
I have been experimenting creating a Copic marker grisaille under my gouache life paintings. It establishes the values quickly, and gets me into the color stage much sooner – which is handy when time is limited.
In the attached photo, I did a grisaille on warm gray Copic markers (W1, 3, 5 and 7) and then painted over in gouache.
It helped me to simplify the detail in the costume and unify the shadow shapes. I had much more time to focus on color.
I recommend trying a grisaille in pretty much any medium – and copies are the fastest! 🙂
Thanks for the awesome post – keep ’em coming! 🙂
Copics, not copies. .. darn auto-correct. LoL
Thank you for this Christopher! I’m excited to try this out on some dinosaur designs I’m penciling 🙂
Very interesting, I kinda do this, but I lay the color first then use grays on top. Can’t wait to try the proper technique out. Thank you Christopher, your the best.
Hi Tay! 🙂 Modifying color with gray over the top is a very useful technique and is in no way “wrong”. You do get a very different effect reversing the order though 🙂
Hi Christopher! I’m curious: you say “Inkjet ink is impervious to Copic ink”… I tried one of your tutorials, printed the page over COPIC paper and started coloring. I noticed that each time the marker touched any black line, it’ll become stained, and no matter how hard I try, the stain is still there. It does not alter the final color of the marker now, but the stain looks awful, so the maniac inside me feels uneasy everytime I use that particular marker. Should I do something else while printing? Maybe tone down the lines, make them more transparent or whatever?
WOW, I’m not an artist but I have a boatload of Copic and other brands of markers. With all those markers you’d think I could colour a simple drawing. You’d be wrong. In frustration, I decided that maybe I could do all that shading and stuff in Procreate on my iPad, print and then colour. Before I tried it, I googled one more time to see if there was a better way.
THEN, I found this tutorial. I guess the universe was guiding me. Thank you!